Tuesday, January 3, 2012

Daisies in the Wind Quilt Kit

I have just added to the website the Newest Quilt Kit in Store Called Daisies In The Wind.
The fabrics in this kit are mainly Pink, Purple and Green, These fabrics are a william Morris Collection of Fabrics.
They are all put together to make this gorgeous Quilt Kit, The colours are just beautiful.
The Kit is exactly the same as pictured below.

Be sure to check our website under the kits section for this Beautiful Kit.

Until Next Time Happy Quilting!

Tuesday, August 30, 2011

Feathered Star Quilt Kit

Feathered Star Quilt Kit.
I am currently working on a feathered star quilt kit. I have 2 blocks completed so far.
I will post a couple of pictures shortly.
The colorway I have chosen is one of the colorways that will be available on the website. A lot of people think that this quilt pattern is a "Not to attempt" block. But actually is a very easy block to put together. If you have accurate 1/4" foot on your machine. And you can cut accurately, and sew accurately. You will put this block together very very quickly.
I have attempted this block about 3 years ago, using templates. And never again will i use plastic templates to make a Block. This time around I have used just my ruler and by cutting and measuring very accurately. then piece very accurately. You can make this block. with ease. As i have done.
I have found by drawing an accurate 1/4" around all the pieces i HAVE CUT OUT. i CAN THEN PIN AND PIECE THEM VERY ACCURATELY.
So far I have completed 2 blocks for this feathered star quilt. i am still working on the remaining blocks for this quilt. I will then write up the pattern without all of my scribbles. and Put a Kit together to make this quilt.
But at the moment I am very very happy with the progress of this must have quilt. I am also thinking about making a hand pieced one as well. Just so I can have something to do while I am sitting with my husband watching TV.
Here I have cut out a couple of the blocks and getting ready to put them together.
Thinking maybe i should do one in a two color quilt.

Thursday, August 4, 2011

New Kits in store next week

The Jack & Jill Quilt
Is based on a simple-to-cut checkerboard pattern, this single bed quilt features pure cotton fabrics in a myriad of spot designs. The fresh approach is reflected in the symmetry of the design with its diagonal placement of squares. Equally, you could throw caution to the wind and combine the coloured squares in a random pattern for a completely different effect. See below to find out how you can purchase this smart quilt kit – in either blue or pink colourways – with full instructions and all fabric for quilt top, and binding.Click here to purchase the Jill  or the Jack Quilt Kit.
It took me very little time at all to put this quilt top together. Now all I have to do is work out how I am going to quilt it.
This one is the Jill Quilt. I have put together.

_
The Autumn Harvest Quilt
The arresting colour scheme of this unusual quilt belies the simplicity of its construction. Simple squares and rectangles are stitched into the one block, repeated throughout. Variations on the theme? Always! Change the orientation of some of the blocks and you’ll get a completely different look. You could also make a smaller quilt and use the remaining blocks for pillowcases. The kit includes all the fabrics needed to cut and assemble the quilt top including the binding (excludes batting and backing fabric). The quilt measures 243 x 294cm which is a very generous fit for a queen or king size bed. You get the complete step-by-step instructions and, as there is no tricky piecing, this is a project suitable for beginners and seasoned patchworkers alike.
Click here to purchase this quilt kit. This quilt kit will be available in a couple of different colorways. I will add a few pictures once a couple of the quilt tops have been put together. Just to give you a more accurate view of the colour choices.
_
Paddington Squares Quilt
These quilt Kits will be available in store Next week.
We will add some links for these shortly.
Click here to purchase this quilt kit

Sunday, July 24, 2011

New Paddington fabrics

I have added to the website today two of the fabrics, by the metre from the Paddington Range of fabrics. These fabrics, are in the Black and white Paddington slices on the website, as well as the Paddington Logs. Also match these fabrics.


Click the image above to be taken to these fabrics.
Here you can find the Paddington Slice
Here you can find the Paddington Log.

Tuesday, July 19, 2011

New Lapel Pins and Charms

We have just received our shipment of Lapel Pins and charms today, I am still adding them to the website, I am yet to get some photos of them, so please be patient while I am getting them together,
The Lapel Pins are $9.95
The charms range from $7.95 to $9.95.

These are a great addition to a quilters charm bracelet, you could even add them to a quilt top to add more interest. They are so gorgeous.

I have a few of them on the webiste but the pictures are on there as yet. But here is a view of what we are offering on the website.
Any questions email us here.

Check this out.

Thursday, July 14, 2011

Beyond Color Purple Quilt Project

Beyond Color Purple Project My version of Jenny Haskins great Quilt.
My Next Embroidered quilt I am working on is below, no name as yet.
I have only started on the first block as yet, so this one will also take me a little while to get finished.
Below are the pictures of the first 3 blocks i am going to make.
Block 1

Block 2

Block 3

I am using a white back ground for my blocks, on this quilt.
Here is a few pictures on my progress of these Blocks.


That is Block one Completed today!
The 3rd quilt Well I havent actually started on that one yet, i plan to get to that one tomorrow.
I am so excited about it, and I am sure you will enjoy keeping up to date with me on that one as well.
Now onto my interpretation of Fire and Ice.

Sunday, July 10, 2011

Other embroidery

Other Embroidery Projects
Here is a picture of one of many embroidery projects I will be working on, this picture is in Green designed by jenny haskins, i have the opportunity to do this in my choice of colors, for a contest I am entering into: I will not give all the details until i have completed the quilt top and entered the competition.
I am using the fabricadabra By Jenny and simonn haskins, Simon has actually made the quilt pictured, I am doing mine in reds Black and Whites. Using Red Black and white farbics, that is all I am going to share about this contest, as it is a secret until the quilt is completed. So you will have to wait and see how the finished quilt looks once it is completed.


I will add pictures here as i am doing the quilt top to keep you all posted.


 I will also be designing another quilt top as well, it will be in red and Black Cotton Sateen fabrics, with embroidery designs on each piece. I am so looking forward to making these two quilt tops, as it has been a couple of years since I made the last one. I get such a thrill out of designing and putting them together. It is just a "shame" that I don't have as much time as I wish i could have to make heaps more. But I guess as the weather gets warmer and warmer, i will have more and more time during the day to get them done.

Designs from Sue Box

This one I made a Wallhanging for Nan Fraser and she has this completed embroidery hanging on her wall in her bedroom, I made this wall hanging from designs that Sue Box has sold on a collection CD.
These are fantastic designs to embroidery, stitching is absolutely beautifully done.
I will have to get a better picture of the completed wall hanging and put up.

Aqua Marine Ambience

Well I have made a start on the Aqua Marine Ambience Quilt by Jenny and Simon Haskins.
My version I have called Musculan Me.
I have only half completed the First Block of this quilt. So I hope to have the block completed by tomorrow afternoon.
I will post a photo of the first completed Block then.
I am doing mine on White Silk fabric, with pink and Beige coloured threads.
This one i felt needed to go on my bed, but my husband and I share the bed so that is were the colour combination came in. So I have had to share the colours a little. So he doesn't start to feel a little on the feminine side. So I have chosen the colours to suit the both of us.
I hope you all like it.
I have now move donto the 2nd Block already and it is only Sunday. Wow I am really getting the hang of things.

Maybe by the end of the week I might have this quilt completed, well maybe no quilted. But i will have all of the blocks finished.
Well it is mid week and i am almost finished Block 2 of this beautiful quilt.
I am so excited about getting it finished. My machines just can't embroider quick enough for my liking....lol.
Just want it all finished and completely quilted and on my bed.

Tuesday, July 5, 2011

Pink Lullaby Quilt

I have yet again made a start on another quilt I have designed using the Vintage embellishment designs of Jenny Haskins.
 This is Block 1 of the quilt completed.
I will add the picture shortly.
I will put each block up as I get them finished for this quilt.
I am entering a competition with this one.

Monday, July 4, 2011

Soft light Quilt Project

I am working on another embroidered quilt project this one I have called Soft light.
 I am embroidering this quilt with a Soft Light Metallic thread from Urban Zundt.
This is the centre piece of the quilt so far.
You can't really see the effect of the Thread it is fantastic when viewed with the naked eye. I will try and get a few more better pictures.

This one is incomplete, but it shows the effect of the thread i used.

Sunday, June 19, 2011

Fire and Ice Embroidered Quilt Project

My Interpretation of Cabochon Treasures
I have called mine Fire and Ice


Designs in this quilt are original designs by KennyKreations designed and digitised by Christine.
you can purchase these designs just like i did from HERE.
Well i had completed half of my block for the Fire and Ice Embroidered Quilt.
Here is a few sneak Peaks
Here I have my Block Cut out for the Centre Medallion of the Quilt, I have put all of my registration marks on my block, then placed my templates were I need my design to embroider, then done my markings hooped it up and off I go!!!
Here I have stitched out the first color choice, then onto the second color choice, this design has taken me 80 minutes to embroider, mind you I have had to change thread colors about 6 times, during the embroidering of only half a block. This is the left side of the centre block for my quilt.
Here I have added the second color and almost finished sewing for that color, now onto the next picture, of todays project.


Here is the finished right hand side of my Block completed today, I have the left hand side of the block already in the hoop and on the machine, hopefully will continue to sew the remainder of the block while I am here Blogging. Anyway I plan to have the Centre Block completed today being Sunday, then finishe the rest of the Blocks during the week after work, So i am guessing it will take me roughly 2 weeks to finish the Quilt top, then get it quilted. So I will keep you updated on my progress as I get blocks completed.
Ok Centre Block of quilt is completed. Finally,
 I have now started going around the outsides of the block to fill in my design, this is were I am up to with this quilt so far.

This is were I am at so far with this quilt, But I should be finishing this one before moving onto another, but i couldn't help myself I have 4 embroidered quilt projects all going at once, one per machine.

I am waiting for some more of the Sticky stabiliser to arrive befor I can embroider any more of this quilt. So i guess it is time to go finish a couple of the other quilts. Until i can get this one finished.

Saturday, June 18, 2011

Newest Embroidery Projects

Well I have started a New Embroidery Project today. My husband has been so kind and let me have the full weekend to do whatever I please. So I decided I would create an embroidered quilt.
But instead I decided I would start 3 embroidered quilts.....lol. I had a hard time deciding on which one I wanted to make so I decided I would do the 3 of them. So I have started.
Here is the starting block of my Moulin Rouge Quilt.
The start of my great adventure.
Here I have marked out my block with all the marks i need to make in order to get my embroidery designs in the exact placement i want them.
Here I have printed out all of my templates ready to place them were I need them on the fabric block, this will ensure that, all the designs line up perfectly.
Here I have started the first Block of the Summer Wine Quilt i am making. I have sewn an outline of the design on the fabrics block, i have them layed a piece of fabric over the outline and stitched another outline of the design i am embroidering.
Here I have trimmed away the excess of the fabric i have stitched outlines around, I am now ready to stitch my complete design onto the Block. So I guess you can call it Embroidered Applique.

Thursday, June 16, 2011

Home at LAST!!!

Well finally after 5 days away, I am Finally Home, and glad to be home.
The driving is the most tiring of all, Especially when you are so far from home, and you don't have that second person to entertain you.
But I can say "YES" I did have a fantastic time, Great people, great classes, "YES" i did learn a few things that I didn't already know. A few new tools to add to the Embroidery section of my sewing room, I plan to put these to the test over the weekend. I am dying to test them out, the question is going to be are they going to make life easier when it comes to perfect placemet of embroidery. I think so.

Well I am back to work. To plan on something to embroider this weekend.
Until Monday. I would have all the plans for the weekend of embroidering, which i have not done in a little while.

Sunday, June 12, 2011

Echidna Convention

Well Day 2 is almost half way through, a spare moment to blog, and am I over-whelmed with all of the products that are on offer here at the Convention.
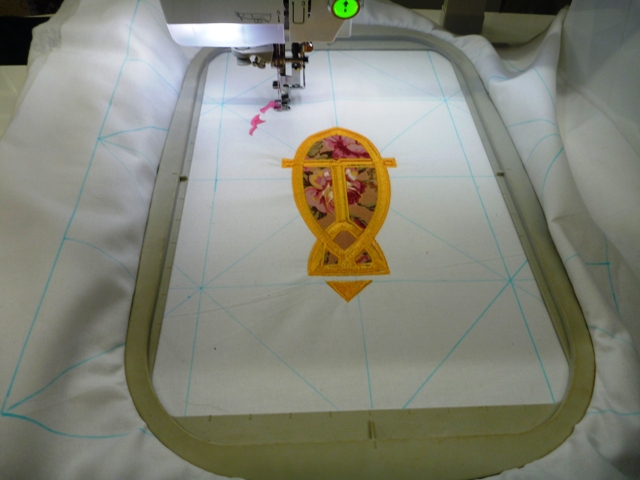
Morning started off with the complete details and hands on experiment with the New Brother PR1000 o.m.g. Do I want one of those New Machines. Is a huge amount of money to hand out for an embroidery machine mind you.
When I purchased my Brother PR650 Back 6 years ago, I thought I had the top of the line machine back then.

Mind you this machine still sews today like a new machine even though I purchased it 6 years ago. It has done an enormous amount of countless hours of embroidering.

But back to the reality of things, my husband has informed me this morning that I dont need the new Brother PR1000, as mine is still sewing like a breeze.

So I have decided to not yet upgrade my machine, after all I have not have any problems with the machine in 6 years so i dont think that i will.

We did have to make a quilt for a boy and a quilt for a girl. These quilts are all on display here at the convention, I will have a few pictures a bit later on to share with everyone. These quilts are being donated to the Childrens hospital, we are not quiet sure were and when but they will all be held in trust for some very lucky young children to cherish.
The quilt for a boy

The quilt for a girl


I have also learned a lot of brand new techniques, from this seminar this time around, a lot of them I have encountered problems with, and I now have solutions for them. So thankfully I can go home and put all my ideas into a fantastic little project, but I will keep you all up to date on the progress of embroidery.

I have also wondered how to embroider on collars and sleeves, and now i have learned the secret. The Secret Is "ECO STICK" o.m.g. I wish I had found this product a long long time ago, it is so easy and simple to use and doesn't gum up your needles and does not leave sticky residue on your hoops, once it is removed. "WOW". Am I going to make some fun and inspiring things once i get home and have the time too.

I have also learnt of a new ruler that you can buy called the Block Maker, this ruler you can also use in your patchwork, but I will be using it for the perfect placement of embroidering designs in several hoopings to make one Block, I will add pictures of these here shortly.
 But before I go there is an amazing item I found at the seminar this year, something that I should have found when I first started out embroidering, it would have been put to a lot of use back 6 years ago, would have saved me a lot of time un picking embroidered designs. This is called the Peggy Stitch Eraser.
But you can bet now that i have one on hand I will probably never get the chance to use it..
I bet you.
Below are a few things I have treated myself too while having a free time to go shopping at the convention.
Thread Tension Gauge


144 Pre-Wound Bobbins


The Rhinestone Applicator


Gold Rhinestones


Rainbow Rhinestones.


Clear Rainbow Rhinestones
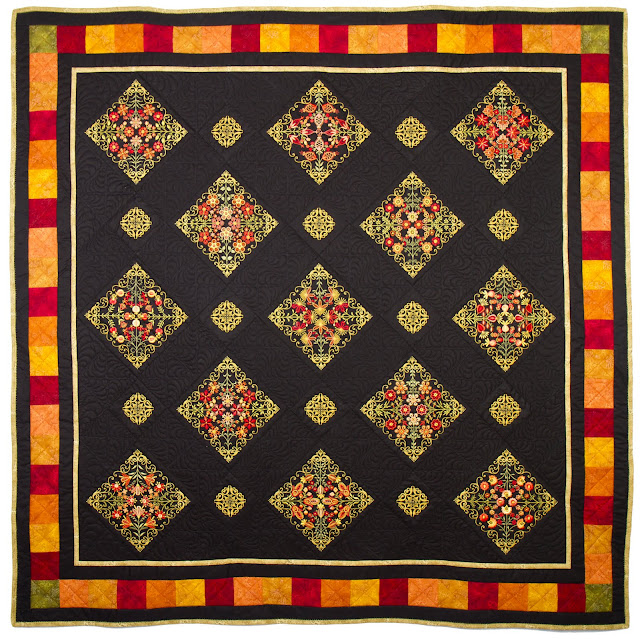
I bought the Rhinestone Applicator and Rhinestones, just to Embellish A Quilt that I plan to make from one of the Most Popular designers Jane Samson.
A picture of her quilt is pictured below.

Some of the other Embroidery design sets I got are of these pictures below, I plan to make all of them before I am too old, to embroider.
I will add a few more pictures  when I have a bit more time.

Conrad Jupiters Casino @ Gold Coast QLD.
Is a wonderful place to stay at the Gold Coast, the view from the 14th Floor were I slept, was absolutely wonderful late in the evening as well as sunrise in the morning.


here is a look at what the inside of my room looked like.


These are the pictures inside my room.1405 of the Casino.

Hello And Welcome To My Blogspot

Welcome I hope you enjoy reading, What I like to write about!